Showing posts with label Crafts. Show all posts

Sunday, December 13, 2015

La Leyenda de La Flor de Nochebuena / The Legend of the Poinsettia

   I hate how time has gotten away from me once again! This year has been by far, the fastest that a school year has gone...I cannot believe that it is already December 13th!
   This past week, we started a Holidays Around The World mini unit. In the primary classroom, the children learned all about Hanukkah, made a Menorah, learned how to play Driedel and we even had applesauce and latkes for snack on Friday!
Menorah
 Driedel
Applesauce & Latkes
   In Spanish class, I have begun to teach the children how Christmas is celebrated in Mexico. Growing up, I remember the traditions that my family had and some mirrored the traditions I read in the books that I chose to read to the children. So it was kind of nice to go down memory lane and remember the good ole days! This past week we read the book "The Legend Of The Poinsettia" by Tomie dePaulo. It is quite a detailed story so I had to paraphrase and summarize, but I made sure to highlight the main idea...that being that the legend was that the Poinsettia first bloomed on Christmas Eve and is now known as the Flower of the Holy Night or La Flor de Nochebuena.
   A simple craft followed as they each made their own poinsettia. Some wanted to take them home right away to put on their tree, while others wanted me to hang them up around the school!
  This coming week, we will be learning more about the Story of Christmas, the traditions of Nochebuena and Las Posadas. We will learn more about how Christmas is celebrated in Mexico...and I am excited to teach the children a little bit about some of the traditions that I had while I was growing up!!

Tuesday, August 26, 2014

Crafty Tuesday...DIY Mini Chalkboard

   Ok, so I haven't done a Crafty Tuesday post in awhile, but my craftiness has absolutely not been abandoned!
   Chalkboard paint is the new craft craze these days and I was eager to create something. The only materials that I found for a writing center (in my teacher stash and materials in the center) were white boards. What ever happened to chalkboards? So there was my little project: I made mini chalkboards for my preschool classroom!
    Very simple and quick to make! 
    I just grabbed 2 mini clip board & paper sets at the Dollar Tree and picked up some chalkboard paint at Michaels. (I love that these 2 stores are two doors down from each other in the same plaza! Makes shopping easy, but sometimes not so great on my pocket!)
    Anyhow, each clipboard needed two coats of paint and I waited at least an hour between each coat.
And within 3 hours time, I had some cute little mini chalkboards- and paper pads--that are going to 
go into my Writing Center!! 

Tuesday, April 8, 2014

Crafty Tuesday: DIY Vase Makeover!

    I am going to keep this short because I have had two fun eventful days this week! I was called in to be a substitute teacher at the little munchkin's school and I was over the moon about being able to step in a preschool classroom again!
    Needless to say, it has been 7 long months without the need to have unlimited amounts of energy to keep up with preschool age children... so yes, I am quite exhausted! AND- I actually like this type of exhaustion, knowing that I spent the day teaching little munchkins. Yea, I know, I am weird. Call it crazy, call it passion, call it what you like- but I love it!
   Anyhow, back to my DIY craft makeover!
   Pinterest has seriously sparked inspiration in me. I know I have said it before, but it really has. I am more creative than I was just three years ago!
   I decided to give a few rooms in the house a little makeover, simply by replacing a few small pieces of furniture, rearranging some things and adding a pop of color. I chose the color teal because the walls are pale yellow and our furniture is dark gray. Perfect palette...
   Here is how I started:.
(I purchased this vase at Pier 1 Imports several years ago and have long been over the color red, so I decided to give it a makeover.)
   And here is how it came out after 2 coats of teal acrylic paint:
   The total cost of this: LESS than $7 (just counting art materials I had to purchase, including the fabric flower I found in the dollar bins at Michaels.)
   Here is another one:
   I found this vase (which was white) at the Salvation Army for $2. I painted it with teal paint and as easy as 1-2-3 -- I had another prop for my new shelf unit.
   If you know Pinterest and DIY, then you have probably seen all the easy and quick ways to add a pop of color in any room, simply by painting glass vases/objects.
   Check out this one by Life in Wonderland: (also on my To Do list)
I am going to have fun with this little redecorating project! 

Tuesday, March 25, 2014

Crafty Tuesday: Rainbows, Rainbows, Rainbows!

   Ok, so we are a little obsessed with rainbows lately. Maybe it's just because we are longing for Spring to begin!
   This week, rather than the crafts being done by me, I will be showcasing the craftiness of the little munchkin.
   We haven't done too much painting in awhile, so I thought--why not? Rainbows are so much fun to paint!
   For added fun, I  brought out q-tips instead of paintbrushes.
    And here is how she made her q-tip rainbow!
   She did go through a ton of q-tips because she kept on painting after she made her rainbow!
   The next project she did required some prep in advance...we used a medium sized circle punch to get some colorful circles for the project.
 She glued the circles onto the large white circle in the order of the colors of the rainbow and practiced learning how to say each color in Spanish, 
She then added the word RAINBOW.
Thanks for checking out her Rainbow Crafts today!

Tuesday, March 4, 2014

Crafty Tuesday: Rainbow Wands

    Alright, prepartions are underway for the little munchkin's birthday party!
    I am loving the theme that she chose this year! Earlier this year, she fell in love with The Wizard of Oz (she was Dorothy for Halloween- and I was the Lion & my husband was the Scarecrow)
    After I picked the venue, called Sweet Charlotte's, I thought it would be cool to do a candy kind of theme... so I gave her two choices: CandyLand theme or a Wizard of Oz theme.... it was not a hard decision for her!
    I must admit though, that I was a little biased... I LOVE the Wizard of Oz...and "Munchkin Land" has always been my absolute favorite place! Hence, the word 'munchkin" in my blog name.
     There is SO much that can be done with this theme.From rainbows, to munchkins, to witches...I am trying to stay focused and just stick to the things I have planned for, without adding more or going overboard. - It's hard! Once I get that creativity going, it just keeps going!
     I have a To Do List a mile long, but as I look at it, it is all just a bunch of small things.
    And we all know that it is all in the details! And I am a detail oriented person, and that little bit of the perfectionist in me might seep through while I am trying to get everything done.
    But my mom and sister will be coming into town on Thursday so I will have some extra hands on board to get all those little details done by Sunday.
    For the past two days, I have been working on one of the party favors: Rainbow Wands.
These are super cute and fairly easy to make.
   The only craft supplies that are needed are:
    - White felt sheets
    - Ribbon in all colors of the rainbow
    - Dowel
    - Glue Gun & Scissors

    The hard part was figuring out how I was going to attach the ribbon together and then get it on the dowel. It took a few unsuccessful attempts to find a way that worked.
    First I cut the ribbon to equal lengths, then using just a dot of hot glue, I glued the six colors together at th very tip. (I used my finger - yes on hot glue - to pinch and bind the glue onto all the ribbons.)
Once the ribbons were dry, I glued two sets onto each dowel.
     The instructions I came across, recommended sewing the two white felt pieces to make the cloud.But I have no clue how nor do I have access to a sewing machine, so my hot glue gun did the trick.
     I used it to seal the two felt pieces of the cloud together, leaving a decent size opening at the bottom. 
    Then, I stuffed each cloud with some cotton balls (which I stretched and pulled out a little, and then sealed it all shut with hot glue.
    And there you have it:
 Rainbow Wands
I have to make fifteen of these and right now, my count is at eight!

Tuesday, February 18, 2014

Crafty Tuesday: Gumball Machine

    It's Crafty Tuesday again! It seems like I was just writing my first Crafty Tuesday post a few short days ago.
    So, I'm back with another quick, fun and inexpensive craft that turns out super cute.
    With all the talk and play with candy around Valentine's Day, I wanted to do a little more with candy. And I saw these super cute gumball machines on Pinterest-- so this idea is nothing new--- but I had to try it!
    I'm telling you...Pinterest really does inspire me when it comes to crafting. I have absolutely discovered my inner craftiness since I got addicted to Pinterest.
    "My name is Sara and I am a Pin-aholic"   =)
     Anyhow... all you need are a few craft supplies to make this cute Gumball Machine craft. There are more kid friendly versions of these gumball machines using plastic ornaments/bowls and paper cups. But this craft is for ME,  and my favorite color is purple, so my gumball machine needed to be purple!
And since this is for me, I used a porcelain pot and plate and a small glass bowl (candle holder). 
I also picked up some small round shapes in a pack of eight.
It was very simple and I was done in just a few hours!
Then the little munchkin wanted to make one of her own. I did not have materials for the kid-friendly version, but construction paper always works!
She used a hole puncher for the first time to punch out different colored "gumballs". 
 Then cut out her shapes, glued them together and...
 made a papercraft Gumball Machine!
It is simple, fun and cute!
    I was so inspired by this craft, I decided to create a few learning materials and games for the little munchkin with a gumball theme! I will be sharing some of those activities later this week.

Tuesday, February 11, 2014

My First Crafty Tuesday post!

    Yay!
     This is my very first Feature (weekly) Post titled Crafty Tuesday!
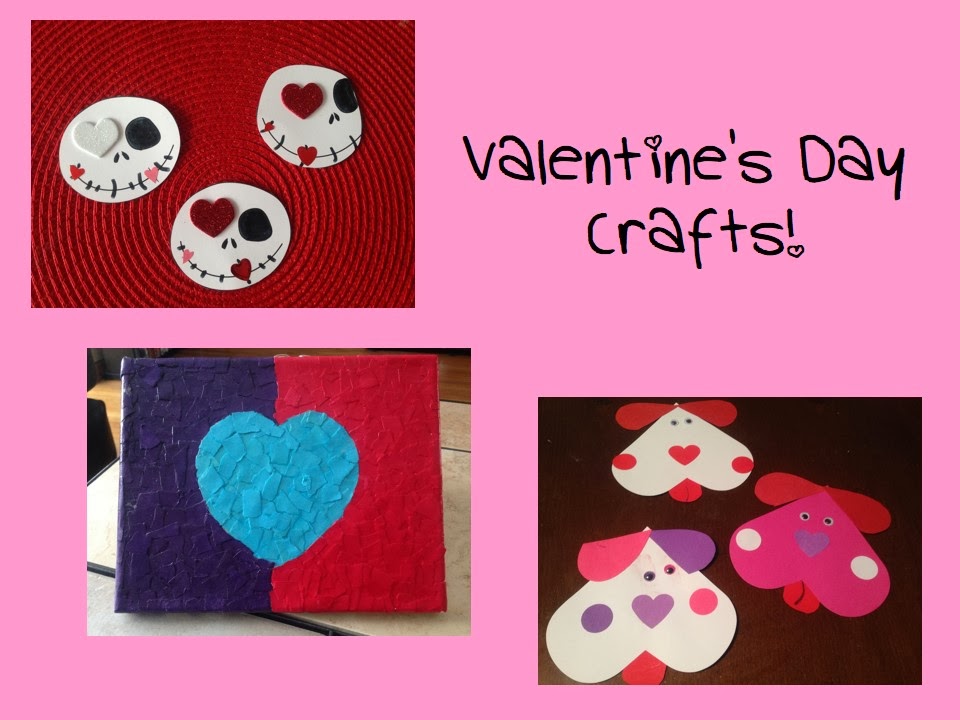
     Thanks for stopping by to see what fun Valentine's Day crafts that the little munchkin and I have made!
    I have not one-- but three fun crafts to share with you today!!
    The walls in my house are quite bare. I am odd and I am not a big fan of hanging pictures or portraits on the wall. But art work... that's a different story. I have taken a liking to wall art sometime within the past year. Specifically canvas arts and prints.
    In honor of Valentine's Day, I wanted to create a Heart Mosaic on canvas. I had seen many awesome ones on Pinterest, and it was on my Craft To Do List. One morning, I sat down with my materials (canvas, shredded cardstock paper and modge podge and went to work.
 I used a wooden heart shape and traced it onto the canvas.
  I used a paintbrush to sweep on the Modge Podge and then placed blue squares inside the heart. 
This was a little tricky at first because I found that the modge podge dried fairly quickly, so I had to do small sections at a time.
 And once the heart dried, I continued on with the rest. 
 Note: I used the Glossy (not matte) Modge Podge and put a coat over the entire canvas when I was all done to give it a sealed and glossy look.
    I have to admit---it doesn't look very mosaic like but any little white spaces drove me a  little nuts, so I covered it all up!
Still looks good though, right?
The next crafts, the little munchkin and I did together.
We made some homemade Valentine's Day cards to send to our family in Chicago!
We found this cute Jack Skellington Valentine craft at Spoonful. 
You can go here  to download a template and make your own.
And we also made some cute Puppy Valentine crafts to send to our family too!
Something about Valentine's Day makes me extra crafty. 
I took a look back and found some other crafts from last year:
And there you have it... a few simple paper crafts and a few crafts that can serve as home decor! 
Happy Crafting!

Wednesday, February 13, 2013

A peek at my Valentine's Day treats!

Well, it has been a busy week for me- with trying to finish up Valentine goodies for my little one's Valentine's Day party tomorrow and for my preschoolers.... AND actually being a teacher and doing stupid mid-year testing AND being a mom!!

ANYWAY.... Here is a peek at the awesome Valentine's Day Treat ideas I found via Pinterest!

After I filled the goodie bags for my daughter's class and my class, I came across these and fell in love with them!
   I had to start on them right away because these cute little containers had to be ordered.  I found them at Stampin' Up. Very cute, many ways to use them AND inexpensive! I got 2 dozen for just $1.77... And the only other things I needed were a bag of M&Ms, Lollipop sticks and some red and pink scrapbook paper.
   I had originally intended on making them lollipops, like in the picture, BUT I couldn't quite figure out how to attach the stick without it being too top heavy!! So, I just decided to leave them as is! I made these for my daughter's classroom goodie bags and for my colleagues at work too!

   And here is my other Valentine treat! SO simple and VERY cute:
   I actually just came across this one on Monday night! I headed to Walmart today after work to get the candy to make them and wow- their shelves were empty!! (What could I have expected, right??)
 So I moved on to Target and after scouring through their almost empty shelves, I found the Nestle Crunch candy I needed. YAY!
  Since the candy supply was limited, I only made these for my daughter's teachers.

   When I take a step back...I realize how far I have come in my love for crafts! This is actually a recently discovered hobby of mine! This Valentine's Day marks one year since my addiction to crafts has sprouted! And all thanks to.... PINTEREST!!  (amongst other factors!)

Well, I hope everyone has a WONDERFUL Valentine's Day tomorrow!! 
ENJOY!

Tuesday, December 11, 2012

Bit by the Christmas Craft Bug!


   This past weekend, I was bit by the Craft Bug and since I was in a Christmas-y mood, I pulled out some of my scrapbooking supplies and started to make a few simple holiday decorations for the house. 
 I only got around to completing one, but I am working on two more.
(Thanks to BHG for this cute and simple idea!)
   I guess my little one felt left out, because she later refused to let me go to the nail salon (which was something I needed badly) because she wanted to do “work”.
   So I pulled together some simple Christmas crafts for her to do.
   I cut up strips of different types of green scrapbook paper and she made a beautiful tree!
This tree will be going in a frame!
   And then we did some cutting practice as she made another tree! 
This is as far as she got and then she just wanted to snip away!
   She got a little carried away with the cutting, as you can see!
This evening, after dinner, she told me she wanted to do more work!  
I love it! I have TONS of cute and fun activities planned for her! 
As I prepare the house for my family in the coming week and a half and plan for the Winter Concert at my Head Start Center, I am also finishing up a little Freebie, that I will post by the end of the week- just in time for TBA's Freebie Friday!