Friday, February 28, 2014

"AT" Word Family Fun... and a FREEBIE!

    So last week, I decided that I wanted to do a little bit of Word Family work. Seeing as the munchkin is learning so many new things lately, I wanted to keep it fairly simple. Sometime over the summer, I came across a post written by Marsha over at A Differentiated Kindergarten.  I  loved what I saw and because she had created such a wonderful product that catered to different learning and ability levels, I had to have it. It is full of so many fun learning activities to use!
  I found it to be a great way to introduce the concept of word families to my little one. Especially since she has mastered almost all of her beginning sounds and is catching on fast with learning sight words. Learning word families will allow her to see patterns in words and will help her later as she starts to read more and it will help her to decode words.
  First I introduced the words in the "AT"  word family to her and displayed these cute picture cards.
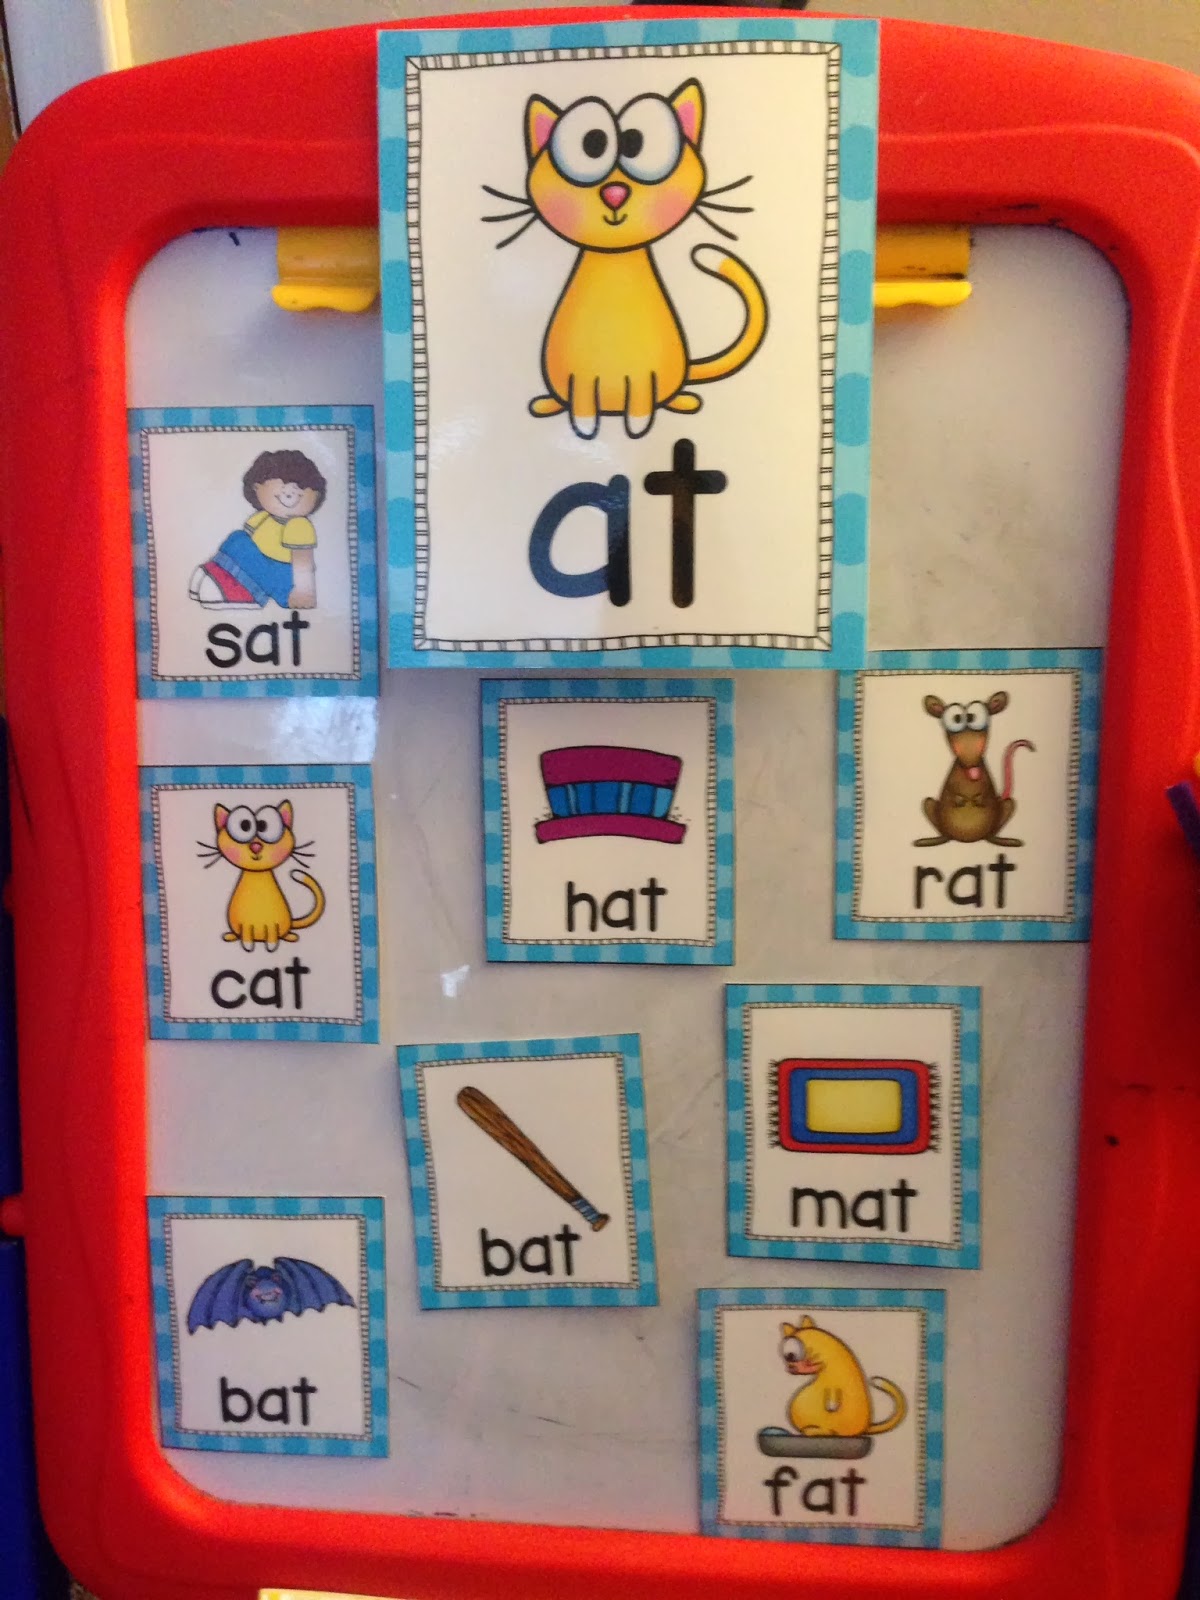
She had fun playing teacher and pointing to each word as she said each one!
    Once it was obvious that she was making the picture/word connection (just by looking at the picture alone), I took it to a slightly higher level and we did some work with matching the words to the pictures.  
  I printed out the sheet with the words and used it as a mat. She then matched each picture card to the words on the mat and covered up the word with the picture card.
Here is another fun one she did to match the picture and word.
And she got some spelling and writing practice in as well, although here, it looked like she was attempting to write in cursive!
All of these fun learning activities plus lots more are all in Marsha's AT Word Work Packet. 
As we did work with the "AT"  word family, I found myself wanting to make a little
display for her to refer back to. And when I saw this idea--because I love the concept of a family and a house-[ I had to implement it! (And I did so using different clip art, for sake of picture variety)
That is the big one that we did. 
I created a smaller version for individual student use!
And this is the FREEBIE that I have for you this week!
Click on the picture to pick up your copy. 
It includes two different sheets (one with words and one without words), for different ability levels.
 Sorry I too so long in showing you what the weekly FREEBIE was.... 
I had to tell you all about Marsha's differentiated packet first!
    We will continue to do some more fun work with the -AT  Word Family, as we engage in Dr. Seuss fun and do some rhyming word activites in the next few days!

Thursday, February 27, 2014

Sensory Fun with shaving cream and sight words!

   So, the snow is back... We enjoyed a few snow-free days and then got hit with reality once again. Ugh, this Buffalo winter sure has been long! And sadly, I don't think we are done with it quite yet!
   Anyhow, as much fun as snow can be to play in (and it is easy to just bring some indoors), the little munchkin and I opted for some sensory fun with another awesome white and fluffy substance: Shaving Cream!!
   She has been learning just over 20 sight words in the past two months, and can correctly identify almost all of them.  I try to do fun games and activities with her to reinfore sight word learning every day. Today, she went on a "Snowball" sight word hunt.  (This is a type of activity that can easily be adapted to learn letters, numbers, etc.)
    I bought some ping pong balls at Dollar Tree awhile back and actually forgot I had them until a few days ago. I wrote sixteen of the twenty sight words she has been learning, onto the pig pong ball. I filled up a bin with shaving cream and hid all of the ping pong balls inside of the pile of "snow".
She dug into the "snow" to find the "snowballs".
    I added another bin of warm water when I noticed that her hands were so full of shaving cream, she couldn't wipe the shaving cream off of the ping pong balls very well. 
She dipped the "snowballs" in the water to reveal what sight word was written there.
    And then of course, once she found all sixteen "snowballs", she begged to play in the shaving cream for awhile longer. She was elbow deep in shaving cream and it kept her busy for awhile, which is exactly what mommy needed in order to get a few things done around the house. Hey, whatever works some days, right?
    So, every few days we review some sight words and we have since reated an "I Can Read" sight word display in her playroom, right on the basement door.
    Every few days, we review the words and once she is able to correctly identify the word at least 3 different times and sometimes on three different days, I know she has mastered it and I give her a star with the word written on it. She colors it (in rainbow colors) and proudly puts it on the door!
    Teaching and learning sight words has been so much fun. I constantly seek new ways to teach her sight words in a fun, engaging way. I know learning sight words can be difficult or even an unattainable skill for any preschool child, as it used to be something that was taught in the later part of Kindergarten or even First Grade. So I always, always try to make it fun at home, no matter what!
    For now, we are both so excited how much (and how fast) she is learning and I love to hear her read the little sight words books that her teacher sends home with her sight word list every few weeks. It gives her so much confidence and I know she is proud of herself everytime she reads a word she knows!

Tuesday, February 25, 2014

Crafty Tuesday: Getting ready for the little munchkin's birthday party!

    So this week's craft isn't as exciting as last week, as I am getting all my craft supplies together this week to start making things for the little munchkin's 5th birthday party!
    It's crunch time now, with less than 2 weeks to go. Thanks goodness I have the next 2 days off, plus more time off of work next week... and my sis and mom are coming to visit next week, so I will have more help!
    We are doing a Wizard of Oz theme this year...another DIY party. ( Last year we did Dr. Seuss) 
    The most important thing- the invitation- just went out yesterday! 
                                               
    There were so many cute ideas, it really was hard to settle on one design. So I tried to use a few different ideas.
   Here is the invitation: I LOVE the wording:
    Calling All Munchkins!

    
    And here is what it looked like from the outside:
                                                 
   And, well, that's all I've got for today...time to start the fun crafts for the party. I will share them next week!

Monday, February 24, 2014

Mad Science Monday!

   Yay! It is Mad Science Monday again!
    It seems to be becoming a little popular in my house! The little munchkin is eager to try mixing things and see what happens, since we had our first Mad Science Monday last week. My 15 year old son also participates and is curious about how all the reactions occur and it leads him to do some self guided research. We have fun and he learns new things! Everyone wins!
    Today, we made what is called "Elephant Toothpaste". I first saw this idea at Fun At Home With Kids, who had seen it elsewhere. Just by looking at her pictures on her blog post, I knew my munchkin would love it and we had to try it.
    Doesn't this picture alone make you curious?!
Now this is a fairly simple experiment using just a few ingredients. 
Dry Active Yeast (I found mine in small packets of three at Walmart)
Warm Water
6% (20 volume) Hydrogen Peroxide (I bought a bottle at Sally Beauty Supply.)
(Regular Hydrogen Peroxide works too but the reaction is not as dramatic and fun)
Dawn Dish Soap
Funnel
Plastic bottle
Liquid Watercolor/Food Coloring
 (I used food coloring but next time I will use liquid watercolor so that it doesn't stain!)
AND of course: Adult Supervision ...and maybe some cute safety goggles!
*Follow all directions on the Hydrogen Peroxide bottle and be cautious when handling, as the concentration used will bleach clothes and can irritate/burn skin.
Here she was --ready to go!
She checked her "list" to make sure she had everything ready!
 So, here is what we did:
I helped her to measure out 1 teaspoon of yeast and 2 tablespoons of warm water. She mixed it together.
  I poured in 1/2 cup of the hydrogen peroxide, food coloring and a few squirts of Dawn dish soap into the bottle and swirled it altogether slowly.
  Using the funnel, she poured the yeast mixture into the bottle with big brother's help. (Look at that face!)
   We removed the funnel and watched the FUN reaction!
 
The reaction was exothermic, meaning it released heat. 
And sure enough, the bottle and the soft, puffy "elephant toothpaste" was warm when we touched it.              (It is safe to touch.)
We HAD to do it again!! This time we used blue food coloring:
 I LOVE the curious faces she was making the entire time!
 This 2nd time around, I ran a little low on hydrogen peroxide and so she watched it SLOWLY ooze out, and then decided to give the bottle a little squueze to help it come out faster!!
This was SOOOO much fun! She wants to do it again and play in it for awhile! 
(I did not allow her to play very long with it because I knew the food coloring would stain her hands)
 So, I have hydrogen peroxide on my shopping list! Oh, and liquid watercolors...
We WILL be doing this again!

Friday, February 21, 2014

The Gumball Craze continues... and it's Freebie Friday!

   The Gumball Craze is still on!
    I took the Gumball Mat that we used to practice counting earlier this week, turned it into a spelling mat and the little munchkin was able to get some sight work spelling practice.
   And because my mind is constantly in teaching & learning mode, I am thinking of tweaking this even further to make a Letter/Sound Match Game. Oh, the possibilities!
Gumball Addition/Number Sentence:
Here is an addition activity she did. She chose two colors of pom poms, added them up, and then created a number sentence to match her picture.

   And then I asked myself: "What fun is a gumball theme if we can't work with REAL gumballs?!"
   So, I caved in and went to Party City to buy single gumballs (because there was no way I was buying a whole bag)  for another math game! I added in a candy scooper, an ice tray and a die.
Gumball Roll & Scoop Addition Game:
    She rolled the die once and then scooped and counted out the gumballs and placed them in the tray. She repeated that once more and then she added the total amount of gumballs she scooped.

    And the BEST part was that I let her try and eat one gumball after her addition practice! I say "try" because these gumballs were far bigger and harder to chew down on!!
    Now for the BEST part of Friday... 
FREEBIE Friday!!
    And because I failed to post a Freebie last Friday, I have TWO FREEBIES for you today!
    The first is the versatile Gumball Mat. In my past two posts, I have featured two different ways to use these mats and I am sure you can think of several more!
   The file also contains a blank sheet of gumballs so you can customize it to meet your learner's needs. 
    Click on the picture below to download your own free copy in my TPT store today!
And the other Freebie for you today is a Math Number Matching Card game... also Gumball themed! 
Click on the first picture to get your free copy!
Enjoy the FREEBIES!!

Thursday, February 20, 2014

Gumball Craze!

   So, after my oh-so-cute Gumball Machine craft on Tuesday, I was inspired to make and create some fun learning activities with a gumball theme.  Because, well...Gumballs are so much fun!
   Ever notice how you can never say "no" to a gumball? Even though you know that 5 seconds after you feel that sugary ooze in your mouth, the gum will lose its flavor? And then you will be reaching for another one? OR is that just me? --- Umm, ok...maybe it's just me!  I can't ever seem to resist popping a gumball in my mouth!
   Anyhow, I pinned and brainstormed tons of learning activities that would be great with a gumball theme. But of course, I can't do it all, right? So, here are a few things we have worked on so far this week.
   First, we worked with some simple math skills.
   Counting:
    She worked on her counting skills with these Gumball Counting Mats that I created with this cute clip art from Ashley Hughes.
After watching her work with the mats, I realized how versatile I can make them. I thought of ways to use this same mat for literacy activities as well, which I will share soon.
( These mats will also be one of the two freebies I will have for you tomorrow for Freebie Friday!)
Patterns:
    She also worked on patterning with pink and purple pom poms and an ice cube tray. She is awesome at AB patterns but still needs a little more work with AAB patterns, but she will get there!
She has a few other fun math activities that she has yet to explore.
Sight Words:
    We squeezed in some Sight Word work, with her latest set of sight words from school. (Check out her super outrageously long last name!)   Hahaha!!
    Anyhow, I am making this post short and sweet today... 
    I need to get out of the Blogging Mode for the night and jump into Birthday Party Planning Mode.... the little munchkin's 5th  birthday is right around the corner and I have lots to do!

Tuesday, February 18, 2014

Crafty Tuesday: Gumball Machine

    It's Crafty Tuesday again! It seems like I was just writing my first Crafty Tuesday post a few short days ago.
    So, I'm back with another quick, fun and inexpensive craft that turns out super cute.
    With all the talk and play with candy around Valentine's Day, I wanted to do a little more with candy. And I saw these super cute gumball machines on Pinterest-- so this idea is nothing new--- but I had to try it!
    I'm telling you...Pinterest really does inspire me when it comes to crafting. I have absolutely discovered my inner craftiness since I got addicted to Pinterest.
    "My name is Sara and I am a Pin-aholic"   =)
     Anyhow... all you need are a few craft supplies to make this cute Gumball Machine craft. There are more kid friendly versions of these gumball machines using plastic ornaments/bowls and paper cups. But this craft is for ME,  and my favorite color is purple, so my gumball machine needed to be purple!
And since this is for me, I used a porcelain pot and plate and a small glass bowl (candle holder). 
I also picked up some small round shapes in a pack of eight.
It was very simple and I was done in just a few hours!
Then the little munchkin wanted to make one of her own. I did not have materials for the kid-friendly version, but construction paper always works!
She used a hole puncher for the first time to punch out different colored "gumballs". 
 Then cut out her shapes, glued them together and...
 made a papercraft Gumball Machine!
It is simple, fun and cute!
    I was so inspired by this craft, I decided to create a few learning materials and games for the little munchkin with a gumball theme! I will be sharing some of those activities later this week.

Monday, February 17, 2014

Mad Science Monday!

    So what do you do with leftover Valentine's Day candy? Have fun with it!!
    The one candy that we have leftover from Valentine's Day that no one in the house particularly likes are Brach's Candy Conversation Hearts. (The other Conversation Hearts that I prefer are the ones made by Wonka SweetTarts.)
   I had seen several ideas on Pinterest (of course) of different experiments that can be done with a few simple ingredients and some candy hearts. I knew it was something that my little munchkin might enjoy. So I took a stab at two different experiments.
     Both experiments called for 4 simple ingredients:
     Baking Soda, Vinegar, Candy Hearts and water.
     The first idea came from Preschool Inspirations.
 Fizzy Candy Hearts
Each heart in the ice tray was filled with some baking soda.
She dropped a candy heart into each heart mold.
Then using a medicine syringe (a dropper would be easier to use but I couldn't find one in the house), 
she dropped in some vinegar with some help from daddy. 
The result was quite a bit of rising bubbles in each mold...and we had Fizzy Hearts!
The second experiment was called:
Dancing Candy Hearts
The idea I found came from  Inspiration Laboratories.
This one started as it was supposed to and then my son got involved and made it more interesting!
For this one, we needed the candy, a bowl (one with a bit of height), baking soda and vinegar.
We mixed the baking soda and water in the bowl.  
She then tossed in some candy hearts.
 There was a little bit of fizzing. 
.
She wasn't thrilled so she added in some more baking soda to get a little more fizzing and bubbles going.
(She was excited, looking more and more like a little mad scientist!)
    And then things got a little more interesting as the little munchkin added in more vinegar from a cup to see what would happen.
    The result was the candy hearts were bopping up and down and flipping over in the bowl! They really did look like they were dancing! The pictures I took do not do the experiment any justice.
    If you vist the link from Inspiration Laboratories, there is a video posted of the Dancing Hearts.
    Then big brother joined in and added a whole lot more vinegar and baking soda and really got the excitement going! 
Check out the looks on her face! 
Pure amazement!!
It was so much fun! 
Here is the step by step procedure that we followed, as posted on Inspiration Laboratories:
  1. Mix 1/2 tablespoon of baking soda in 1 cup of water. Add to container. Add enough baking soda and water solution to make liquid level at least a few inches high.
  2. Measure out 1/4 cup of vinegar.
  3. Add few candy hearts to your baking soda and water solution. Observe the bubbles.
  4. Slowly add 1/4 cup of vinegar to your baking soda, water, and candy hearts.
  5. Watch the candy hearts rise and fall. (They appear to dance around the container doing flips and all sorts of fun stuff.)
Inspiration Laboratories has some very cool ideas and I am actually thinking we might do more fun and exciting science experiments like this and create a Feature Post called:
 Mad Science Monday!